


Smartphone manufacturers ship Android devices with a strict set of permissions and access control systems to protect users from security risks and prevent them from acSmartphone manufacturers ship Android devices with a strict set of permissions and access control systems to protect users and reduce risk.But for users and researchers alike, these controls can limit customization and system-level access. To unlock full device control, many turn to rooting, which grants privileged access to system functions.
For security researchers and mobile app pen testers, the ability to bypass root detection is essential in reverse engineering Android apps and uncovering vulnerabilities. At NowSecure, mobile application security testing relies on rooted devices to analyze app behavior deeply. In this blog, we’ll show how to defeat root checks using Frida, a powerful dynamic instrumentation toolkit.
What Is Root Access?
Having root access to a device provides the following benefits, among others:
- Installing mobile apps found on thirdparty App Stores
- Sideloading applications
- Applying custom themes/skins for applications and the home screen
- Improving battery life
- Enhancing performance
- Modifying behavior of mobile apps
When users have root access, they’re able to tamper with every part of the device. While not every user of a rooted device may have malicious intent, some developers don’t want to allow rooted devices to use their mobile apps.
Why Root Detection Matters
Allowing a mobile app to run on a rooted device opens it up to a wide variety of exploits. Sensitive mobile apps such as banking, medical, shopping and government often implement checks that determine if the app is running on a device with root privileges. In most cases, these checks will prevent the mobile app from functioning properly. Sometimes, developers implement strict root detection capabilities that prevent apps from running at all on rooted devices.
Common Root Detection Techniques
Bypassing root detection is often possible, however the amount of skill that’s required can vary greatly depending on the mobile app. There are many root detection techniques that can be implemented. Some apps use basic checks that can easily be found online, while others may use custom detection methods that have never been seen before. Because most root detection logic runs directly on a device, these techniques can often be uncovered through reverse engineering.
Through a combination of static and dynamic analysis, you can uncover what the root detection is doing, when it is called, and how to circumvent the checks. The steps will not be exactly the same for every app, however the process to bypass root detection is similar in most cases.
Tutorial for Reverse Engineering Android Apps
Being able to bypass root detection is an invaluable skill that all mobile security researchers and mobile pen testers should have in their toolkit.
This tutorial covers the steps to reverse engineer Android apps and bypass three common root detection techniques using Frida. This tutorial uses a rudimentary test app, but the same techniques are applicable to real-world mobile apps. You can download the test app here:
Prerequisites
- A rooted Android device
- An app with root detection
- JADX-GUI
- Frida Python Packages (frida, frida-tools)
- Frida Server running on the target device (how to)
- Basic Knowledge of Java and Javascript
Finding the detection code with static analysis
Static Analysis with JADX
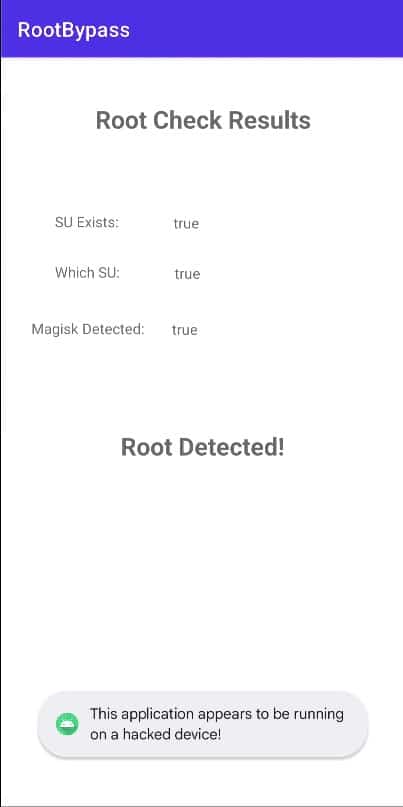
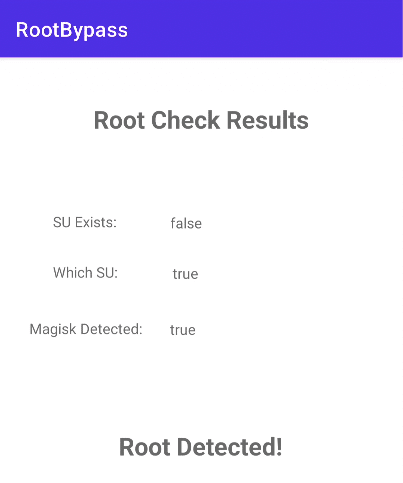
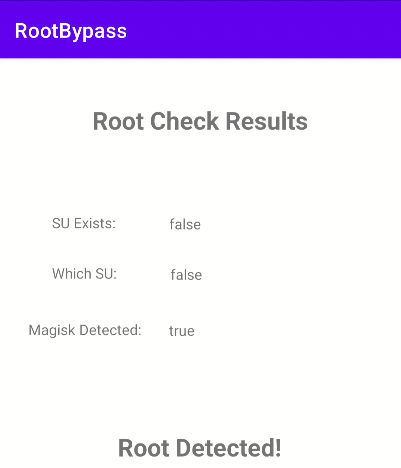
Upon launching the sample mobile app, we can see the three root detection methods that the app is using. Since all three are true, root access has been detected and the “This application appears to be running on a hacked device!” toast appears at the bottom of the screen. Since this toast appears every time the root check fails, we have an idea of where to start looking in the decompiled code.
To decompile the code, start JADX-GUI, select “Open File” and select the APK to be decompiled. Once the Android app is decompiled, start searching for words or phrases that could be related to root detection. Some helpful phrases could be: root detected, su, magisk, root check, is rooted, jailbreak, etc. Since we have a warning toast that displays when root is detected, we can search for the toast’s content.
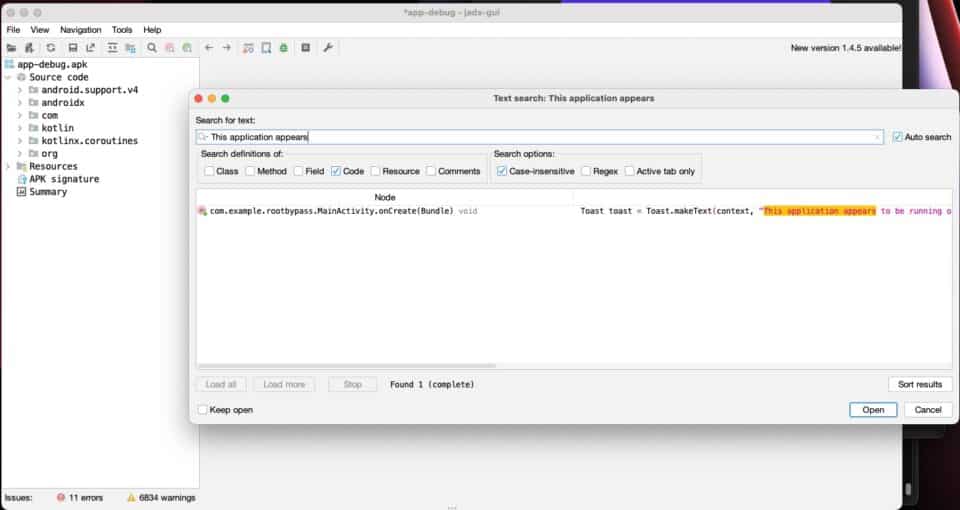
The search results show us the location in the decompiled code where this warning toast is created. By clicking on the search result, we can navigate to the code that is responsible for performing the check and deciding if this toast should be displayed.

The source code shows that a function called checkForRoot is called. If the function returns true, then root access has been detected. Based on this information, the code that we need to bypass must reside inside of this function.
Understanding and Bypassing the Detection Code
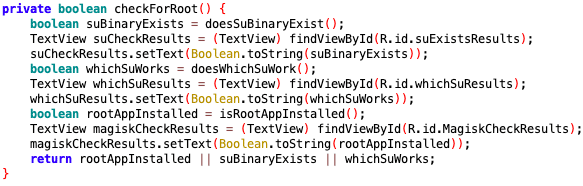
Inside the checkForRoot function, we see that three checks are performed. These checks return boolean values and if any of them are true, then root was detected. These three checks correspond to the three values displayed on the app’s home screen, so we will check them out one by one. Our goal will be to manipulate the app’s behavior, so all these checks return false.
Dynamic Analysis with Frida
In order to manipulate the mobile app’s behavior, we will rely on a dynamic analysis tool called Frida. Frida uses various methods to hook into an application’s runtime and provides an interface for researchers to view or manipulate how a program operates while it is running. In this tutorial, we will use Frida’s JavaScript API to implement our hooks.
su Binary Check
Understanding the su binary check
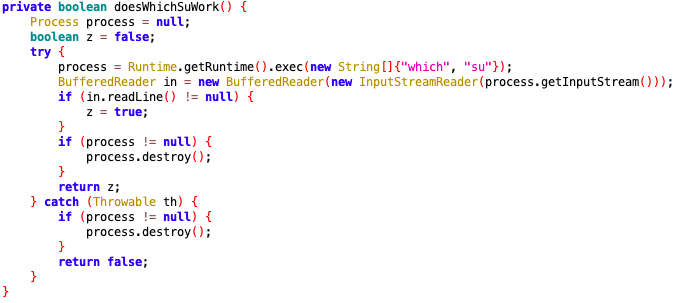
The first check that the application performs is contained in doesSuBinaryExist.
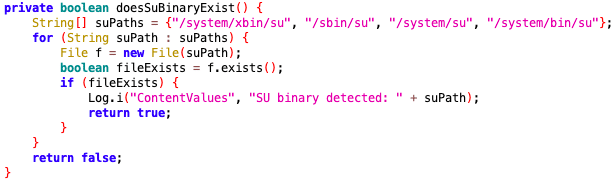
This function creates an array of file paths where an su binary could potentially be located. The code then initializes a File class for each of these paths and checks if the file can be found using an exists call.This check is commonly used in root detection, because an su binary is used by users or applications to gain sudo or root access to a device.In order to bypass this check, we must trick the app into thinking that the su binary does not exist on the device. Since we know that it uses exists to find the binary, that should be our target.
Bypassing the su binary check
Since we want to modify the exists method, we first need to hook into the class that calls the method. In this case, exists is being called from inside the File class. By looking at the list of classes imported into the MainActivity class at the top of the file, we can obtain the File class name that we are interested in.
To start writing the hook, we need to open up an empty JavaScript file. We can start hooking the File class with:
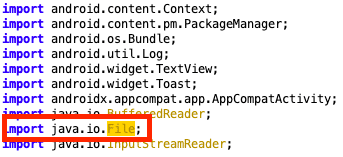
const File = Java.use('java.io.File');
Next, we need to state which method we want to modify. We can do this for the exists method like this:
File.exists.implementation = function () {}
This line of code allows us to overwrite the behavior of what should happen when a call is made to exists. Any code that we want to run should be placed inside of the function that we have just defined.
In order to understand how to implement the bypass, we need to understand how this method works. We can do this by taking a peek at the Android documentation. The documentation explains that the exists method returns true if the path exists and false if it doesn’t. In this case, all we need to do is check if the file path being checked ends with su, and if it does, then we force the method to return false. If it is not checking for su, then we can continue the method call as normal using this.exists.
In order to determine what path exists is being called on, we’ll refer once again to the Android documentation and see if the File class can provide access to that information. According to the docs, the File class has a getPath method that returns the file path as a string. We can manually call this method and use the output to check if the call should be bypassed or not.
The full hook looks like this:
Java.perform(function(){
   // Su Exists bypass
   const File = Java.use('java.io.File');
   File.exists.implementation = function () {
       const filePath = this.getPath();

       if (filePath.endsWith("su")){
           console.log(`Bypassing exists() call to: ${filePath}`);
           return false;
       }
       console.log(`Calling exists() on: ${filePath}`);
       return this.exists();
   };
})
Note: The hook is wrapped in Java.perform(), because this ensures that the Java Virtual Machine will be initialized before we start loading our hooks. If this call isn’t included, you may experience unexpected behavior.
Save the JavaScript file and spawn your app with Frida using the following command:
frida -U -f com.example.rootbypass -l root_bypass.js
The behavior of each argument is as follows:
-U= use the device connected via USB-f= the package name of the application you are testing-l= the JavaScript file to be loaded
If the hook was written properly, the target app should spawn and the terminal should output the following:
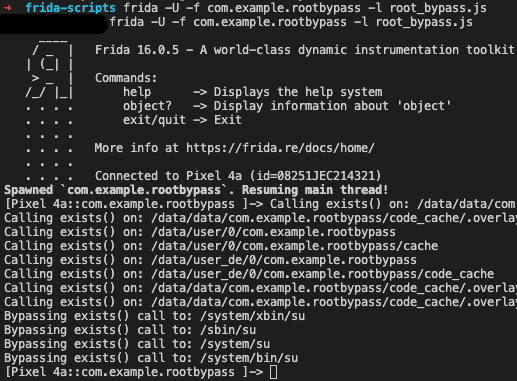
The console output shows us that the su checks were successfully bypassed and all other exists calls carried on as normal. We can also verify that the bypass worked by taking a look at the app’s screen.
That’s one down and two to go!
which su Check
Understanding the which su check
Another way that applications can check if the su binary exists on a device is by using the which command. In our decompiled code, we can see that it runs which su to try to uncover the file path for the binary.
This code executes a which su by using the Runtime class. If the binary is found, the command sends the file path to stdout, but if it finds nothing, nothing will be printed to the screen. The root detection method then returns true if which su sends anything to stdout, otherwise it returns false.
Because most root detection logic runs directly on a device, these techniques can often be uncovered through reverse engineering.
Bypassing the which su check Command
Once again, we need to refer to the Android documentation, but this time we need to see how the exec method operates. According to the docs, it appears that there are multiple versions of exec that can be called, so we need to ensure that we are hooking the version that our target app uses. In this case, the which su command is represented by an array of strings, so we need to craft a hook using the documentation for the overload that takes a single array of strings as a parameter.
Because we also need access to the argument in our hook, we can hook the argument by adding it to the function signature that we create. The setup for the new hook looks like this:
const Runtime = Java.use('java.lang.Runtime');
Runtime.exec.overload('[Ljava.lang.String;').implementation = function(commandArray){}
Now that the skeleton for our hook has been created, we need to give it functionality. Because we want to bypass commands that reference the su binary, we should loop over all the words in the command and see if we find su. The command is stored as an array of strings, so this can be done with a simple for loop. If su is found, we need to swap that word for a string that does not exist on the device and exec the substituted command. The code to should look like this:
Java.perform(function(){
   // Shell "which su" Bypass
   const Runtime = Java.use('java.lang.Runtime');
   Runtime.exec.overload('[Ljava.lang.String;').implementation = function(commandArray){
       for (var i = 0; i < commandArray.length; i++) {
           if (commandArray[i] == "su") {
               console.log("Bypassing command referencing 'su'!");
               var clonedArray = commandArray.slice();
               clonedArray[i] = "NotARealBinary";
               return this.exec(clonedArray);
           }
       }
       console.log(`Calling exec() on: ${cmd}`)
       return this.exec(cmd);
   }
})
This new code can be placed inside the Java.perform() function from the other hook. When the app is launched with frida, the app should now display two bypassed checks:
Root Application Check
Detecting Root Apps via PackageManager
Some apps such as Magisk are commonly used to assist in the rooting process. Having any of these apps installed on a device indicates that it has likely been rooted.
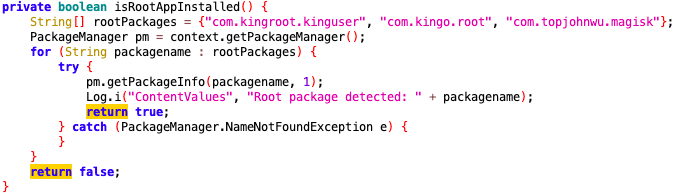
This method checks if any of the three provided root application package names are installed on the device and, if a package is detected, it returns true.
Bypassing the root application check
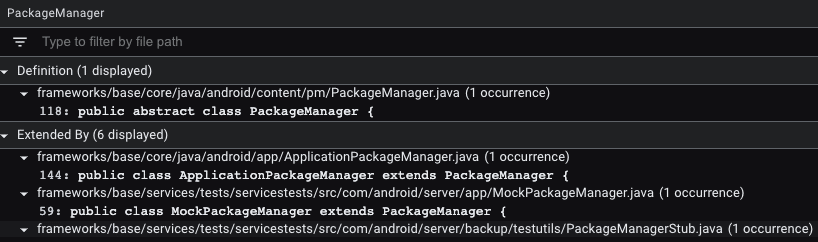
At first glance, this seems like it should be an easy hook to write. All one should have to do is hook the call to getPackageInfo from the PackageManager class and return false. However, if you write a hook for the PackageManager class like this, your hook will never run:
const PackageManager = Java.use("android.content.pm.PackageManager");
PackageManager.getPackageInfo.overload('java.lang.String', 'int').implementation = function (packageName, flags) {console.log("test");}
This is because the PackageManager is an abstract class. This means that you have to search for a class that extends the PackageManger class and write a hook for that. Luckily, Android is open source, so we can easily see all the classes that extend the PackageManager class! If we pull up the Android source code, click on PackageManager, and then click “References” at the bottom, we can see a list of classes that extend it!
The first class that extends PackageManager is called ApplicationPackageManager. Using the knowledge gained from the previous bypasses, we need to look up the arguments and return value for getPackageInfo in the Android docs. Once we understand how the method works and have written the skeleton, the bypass must check if the target package matches what we have installed on our device and insert a fake package name. The finished hook should look like this:
Java.perform(function(){
   // Root Application bypass
   const PackageManager = Java.use('android.app.ApplicationPackageManager');
   PackageManager.getPackageInfo.overload('java.lang.String', 'int').implementation = function (packageName, flags) {
       if (packageName.includes("magisk")){
           console.log(`Bypassing getPackageInfo() on: ${packageName}`);
           return this.getPackageInfo("this.package.does.not.exist", flags);
       }
       console.log(`Calling getPackageInfo() on: ${packageName} with flags=${flags}`);
       return this.getPackageInfo(packageName, flags);
   };
})
Make sure that the hook takes into account the correct overload of getPackageInfo and the function signature accepts both parameters. When this hook is combined with the previous two, we should see the terminal should look like this:
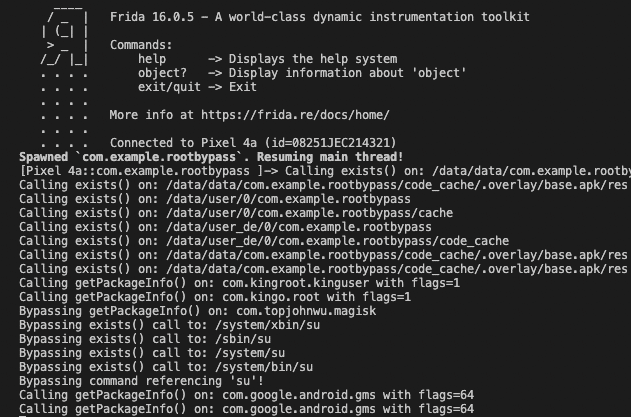
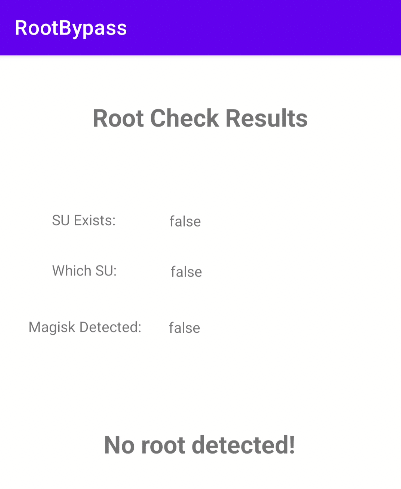
And if all the bypasses work as expected, our app won’t be able to detect that it is running on a rooted device!
Final Thoughts and Tools
While this tutorial only shows three root detection methods, this technique of combining static analysis with dynamic instrumentation can be applied to all methods. As you encounter more root detection techniques and add them to your Frida bypass script, you can create a reliable tool to bypass root detection techniques across a variety of mobile apps.
To save time analyzing mobile apps, pen testers and others can tap the NowSecure Workstation preconfigured hardware and software that compresses mobile app vulnerability assessments down to mere hours and enables repeatable testing. You can also meet the NowSecure experts by registering for ourTech Talks.
Ready to Streamline Mobile App Testing?
NowSecure helps mobile security and DevSecOps teams automate reverse engineer, assess and secure Android apps at scale. Request a demo of NowSecure Platform.